DATUM Gateway on your node + Bitaxe/Nerdaxe
Note: For simplicity, this guide assumes you already have a Bitcoin node running on an Ubuntu/Debian based Linux system and that you intend to run DATUM Gateway on the same machine. If you are using something like Start9 or Umbrel, the process is more straight forward, but slightly different, please refer to the tutorials on YouTube or you can wait until our next guide.
As a Bitcoin miner, you can opt for solo-mining pools like Public Pool or Solo CKPool, or join reward-sharing pools such as Braiins or OCEAN, which are popular among Bitaxe and Nerdaxe runners due to their Lightning Network payout systems.
In both cases, pool coordinators handle the complex task of monitoring the Bitcoin network, including the UTXO set, chainstate, and mempool, simplifying the setup process for miners. However, this convenience comes at a cost: individual miners relinquish control over block template construction. When large centralized pools dominate this process, it risks undermining Bitcoin’s decentralization by concentrating control, enabling potential transaction censorship, and limiting miner autonomy.
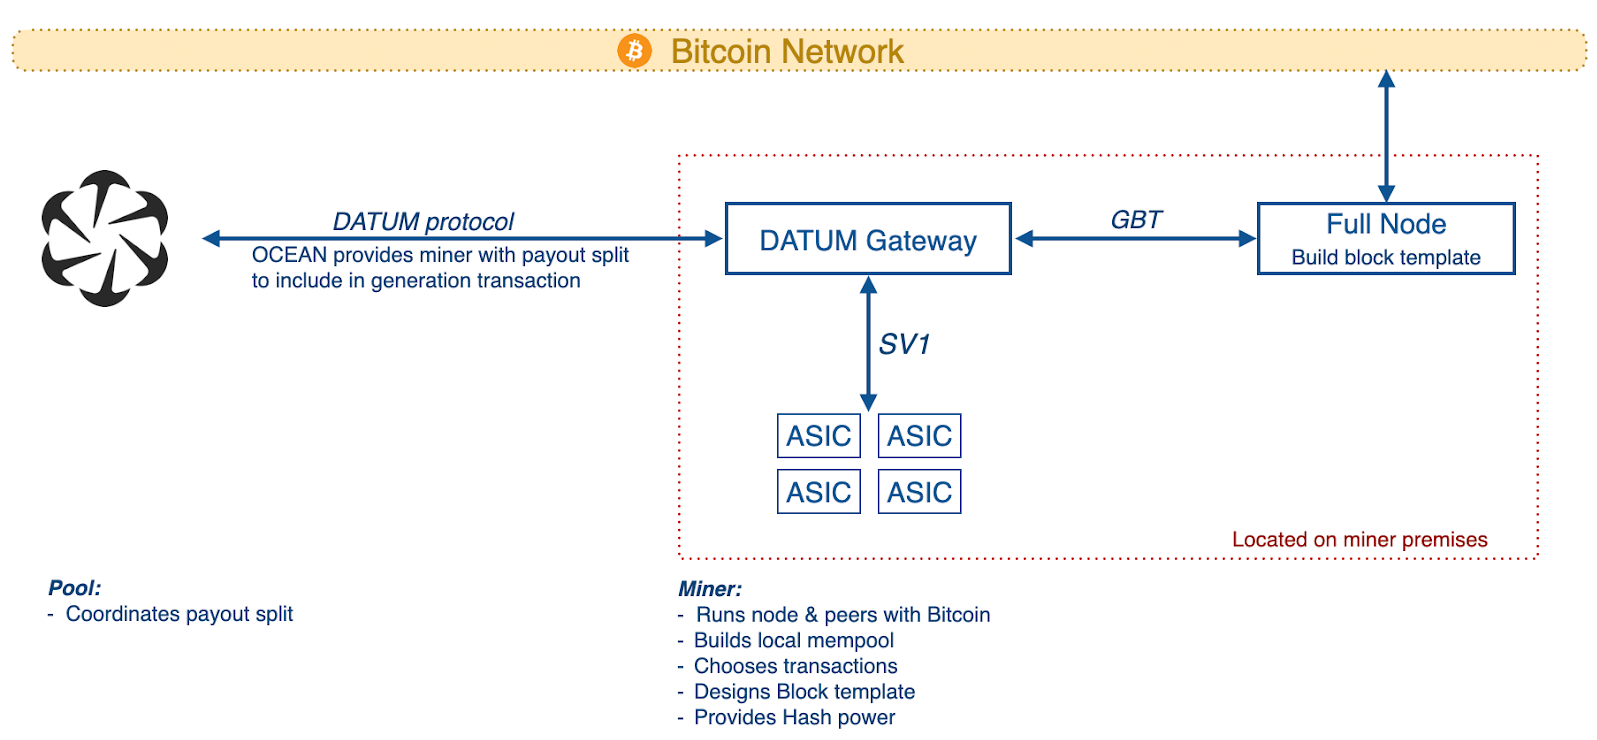
To address this, the OCEAN team has developed DATUM, an open-source protocol empowering individual miners to construct their own block templates, enhancing decentralization and miner sovereignty.
In the previous blog post, we showed how to connect your home miner to OCEAN, select the type of block templates (still constructed by OCEAN), and receive payouts over Lightning Network.
In this post, we will walk you through installing DATUM on your Bitcoin node. This guide is a shorter version of the official DATUM documentation, specifically tailored to Bitaxe/Nerdaxe runners.
Prerequisites
Before setting up the DATUM Gateway, ensure your system meets the requirements and you have the necessary components ready.
Hardware Requirements:
– 64-bit AMD or Intel system (other architectures may work but are unsupported).
– Stable internet connection.
– Fast storage (SSD recommended) for the Bitcoin node.
– CPU capable of running a Bitcoin node without delays.
– At least 1GB RAM for DATUM Gateway, plus 1GB per 1000 Stratum clients (for home use, 2-4GB total should suffice), plus Bitcoin node requirements (typically 8GB+).
– Bitcoin mining hardware, such as Bitaxe or Nerdaxe.
Software Requirements:
– Linux-based operating system (for this guide, we will assume the use of a Debian/Ubuntu based system).
– A fully synced Bitcoin full node with a mempool (blocksonly not enabled; if you are not sure what this means, your node is very likely compatible, as blocksonly is disabled by default.) Bitcoin Knots is highly recommended by the OCEAN team for better template control; Bitcoin Core works but lacks options. (recommended config options covered below).
– Some external libraries (installation covered below).
Installing dependencies
Open up Terminal and copy paste the following commands to install required dependencies:
sudo apt updateThen
sudo apt install cmake pkgconf libcurl4-openssl-dev libjansson-dev libsodium-dev libmicrohttpd-dev psmisc git -ySetting Up your Bitcoin Node for DATUM Gateway
The DATUM Gateway relies on a local Bitcoin node for block templates via GetBlockTemplate, a Bitcoin RPC method used to construct block templates from unconfirmed transactions currently in the node’s mempool. What transactions are included largely depends on your node’s mempool policy, which is defined by the various flags and options in your node’s config file.
Below are the additional config options recommended in the DATUM documentation, add these to your bitcoin.conf file (by default located here `~/.bitcoin/bitcoin.conf`), using either nano command in the Terminal, or using a text editor of your choice:
blockmaxweight=3985000
blocknotify=killall -USR1 datum_gateway
maxmempool=1000
blockreconstructionextratxn=1000000
If you are running Knots, also add the following:
blockmaxsize=3985000These simply optimize your node to be able to effectively generate block templates to serve to the DATUM Gateway.
In addition, if you are running Knots, check out this page to see some anti-spam options they have implemented in their node serving their own pool block templates – https://ocean.xyz/docs/nodepolicy
Once you are done configuring, you need to restart the node, first stop it:
bitcoin-cli stopThen start it again,
./bitcoind -daemonInstalling and configuring DATUM Gateway
In Terminal, clone the DATUM Gateway repository and navigate inside it:
git clone https://github.com/OCEAN-xyz/datum_gateway.gitThen,
cd datum_gatewayCompile the gateway from source in the cloned repository using the following commands:
cmake .Then,
makeThis generates the `datum_gateway` executable.
Configuring DATUM Gateway
Inside the repository, copy the example config file:
cp doc/datum_gateway_config.json.example datum_gateway_config.jsonEdit ‘datum_gateway_config.json’ with nano or a text editor. Replace the example with the following text:
{
    "bitcoind": {
        "rpccookiefile": "/home/user/.bitcoin/.cookie",
        "rpcurl": "localhost:8332",
        "notify_fallback": true
    },
    "stratum": {
        "listen_port": 23334
    },
    "mining": {
        "pool_address": "YOUR BITCOIN ADDRESS HERE",
        "coinbase_tag_primary": "DATUM Gateway",
        "coinbase_tag_secondary": "DATUM User"
    },
    "api": {
        "listen_port": 7152,
        "modify_conf": true
    },
    "logger": {
        "log_to_console": true,
        "log_to_file": false,
        "log_file": "/var/log/datum.log",
        "log_rotate_daily": true,
        "log_level_console": 2,
        "log_level_file": 1
    },
    "datum": {
        "pool_host": "datum-beta1.mine.ocean.xyz",
        "pool_port": 28915,
        "pool_pubkey": "f21f2f0ef0aa1970468f22bad9bb7f4535146f8e4a8f646bebc93da3d89b1406f40d032f09a417d94dc068055df654937922d2c89522e3e8f6f0e649de473003",
        "pool_pass_workers": true,
        "pool_pass_full_users": true,
        "pooled_mining_only": false
    }
}
IMPORTANT!
- Make sure the “rpccookiefile” points to the correct location of the cookie file in your system (by default inside the .bitcoin directory).
- Put your Bitcoin address, in quoutes (“”) in the field of “pool_address”.
Optional: Change the “coinbase_tag_primary” and “coinbase_tag_secondary” to something that you like. This is a short field of text that miners use to signal that the block was mined by them. In case of pooled mining, the primary tag gets overwritten (only the secondary is visible), and if solo mining, both custom tags will be used.
The above config sets you up to be mining on OCEAN, while you construct the block templates yourself, using transactions from your own mempool.
Run `./datum_gateway -?` for full list of config options and their descriptions.
Running DATUM Gateway
Start the gateway and monitor it. While in the datum_gateway repo, execute the following command:
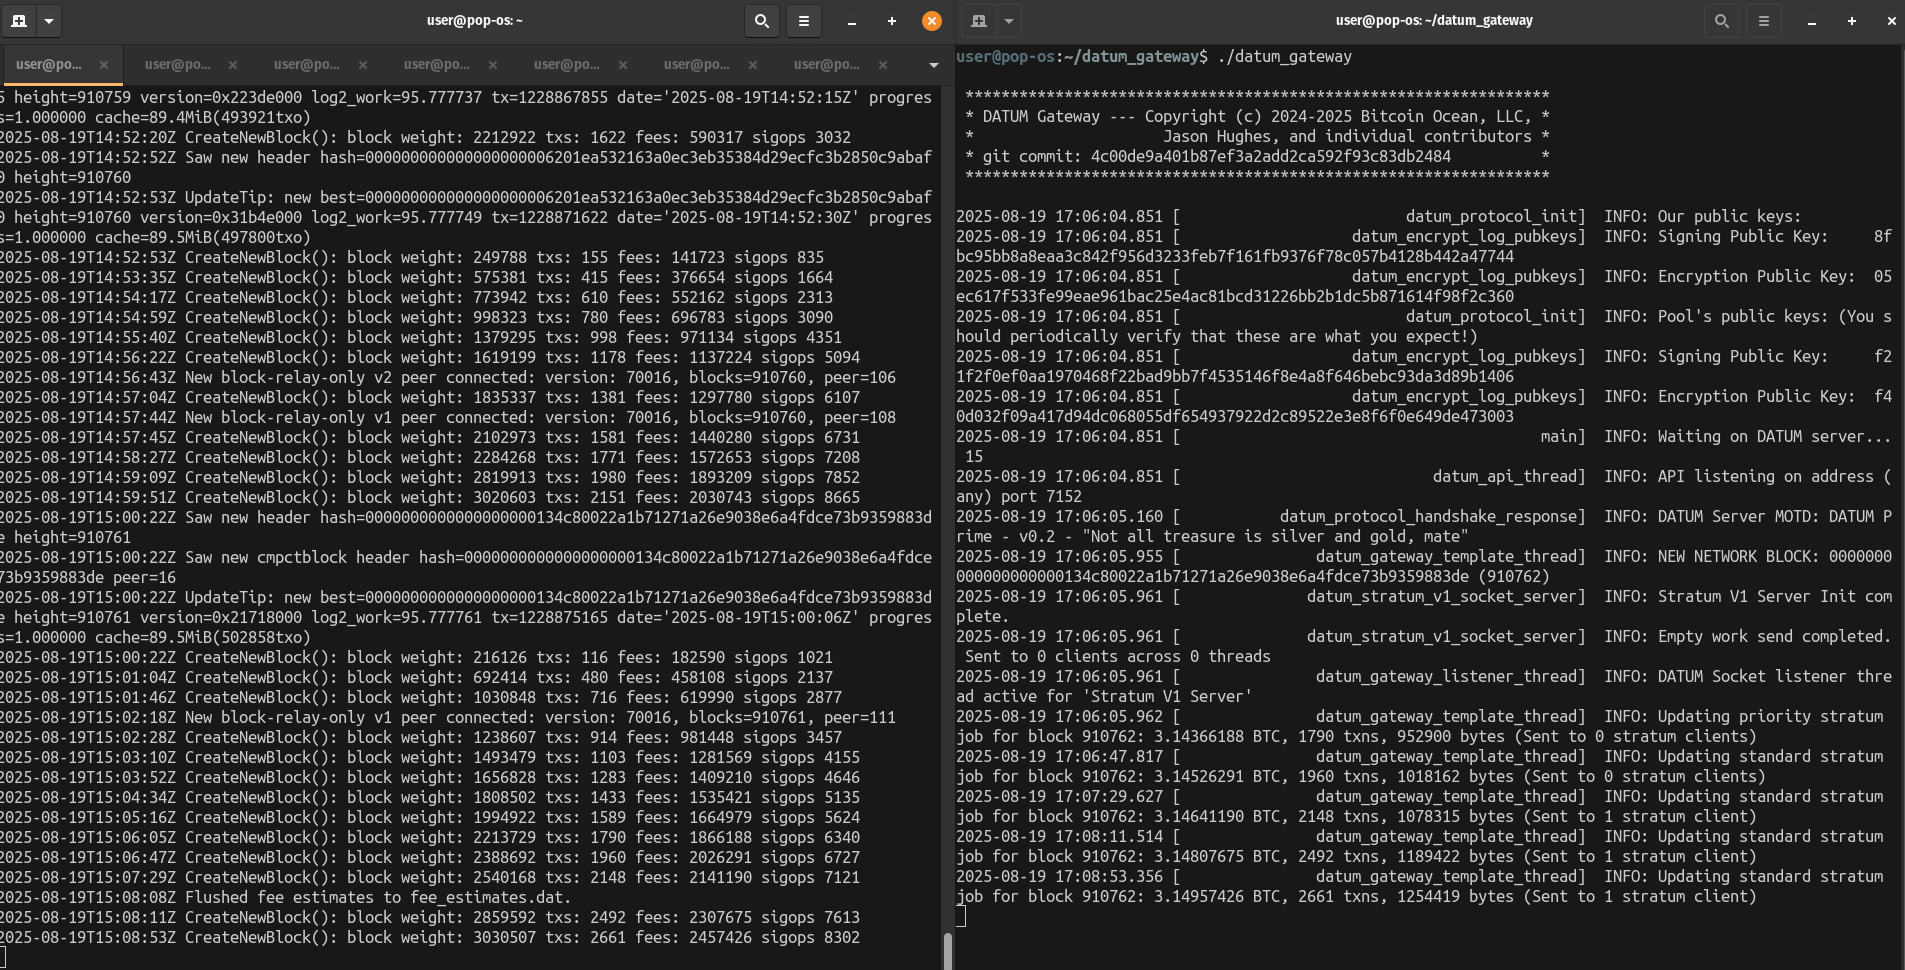
./datum_gateway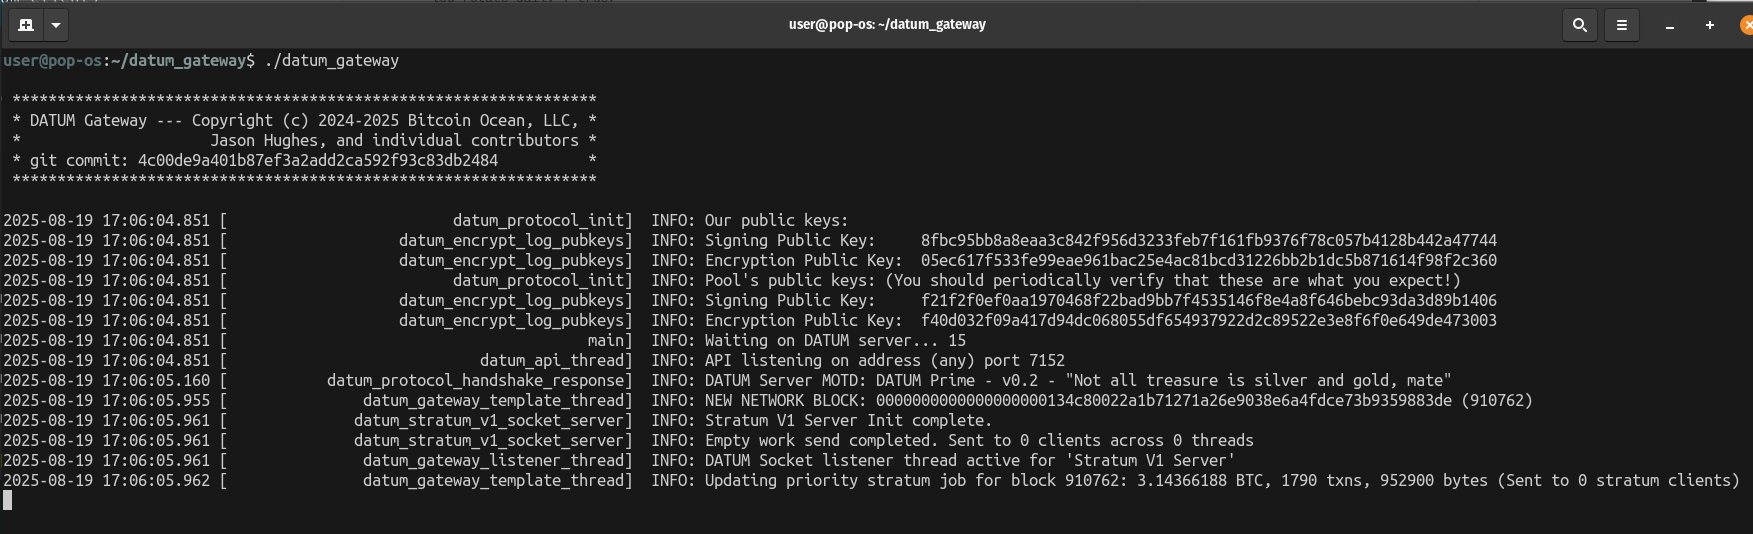
It loads `datum_gateway_config.json` by default.
Check logs for errors (outputs to console or configure logging).
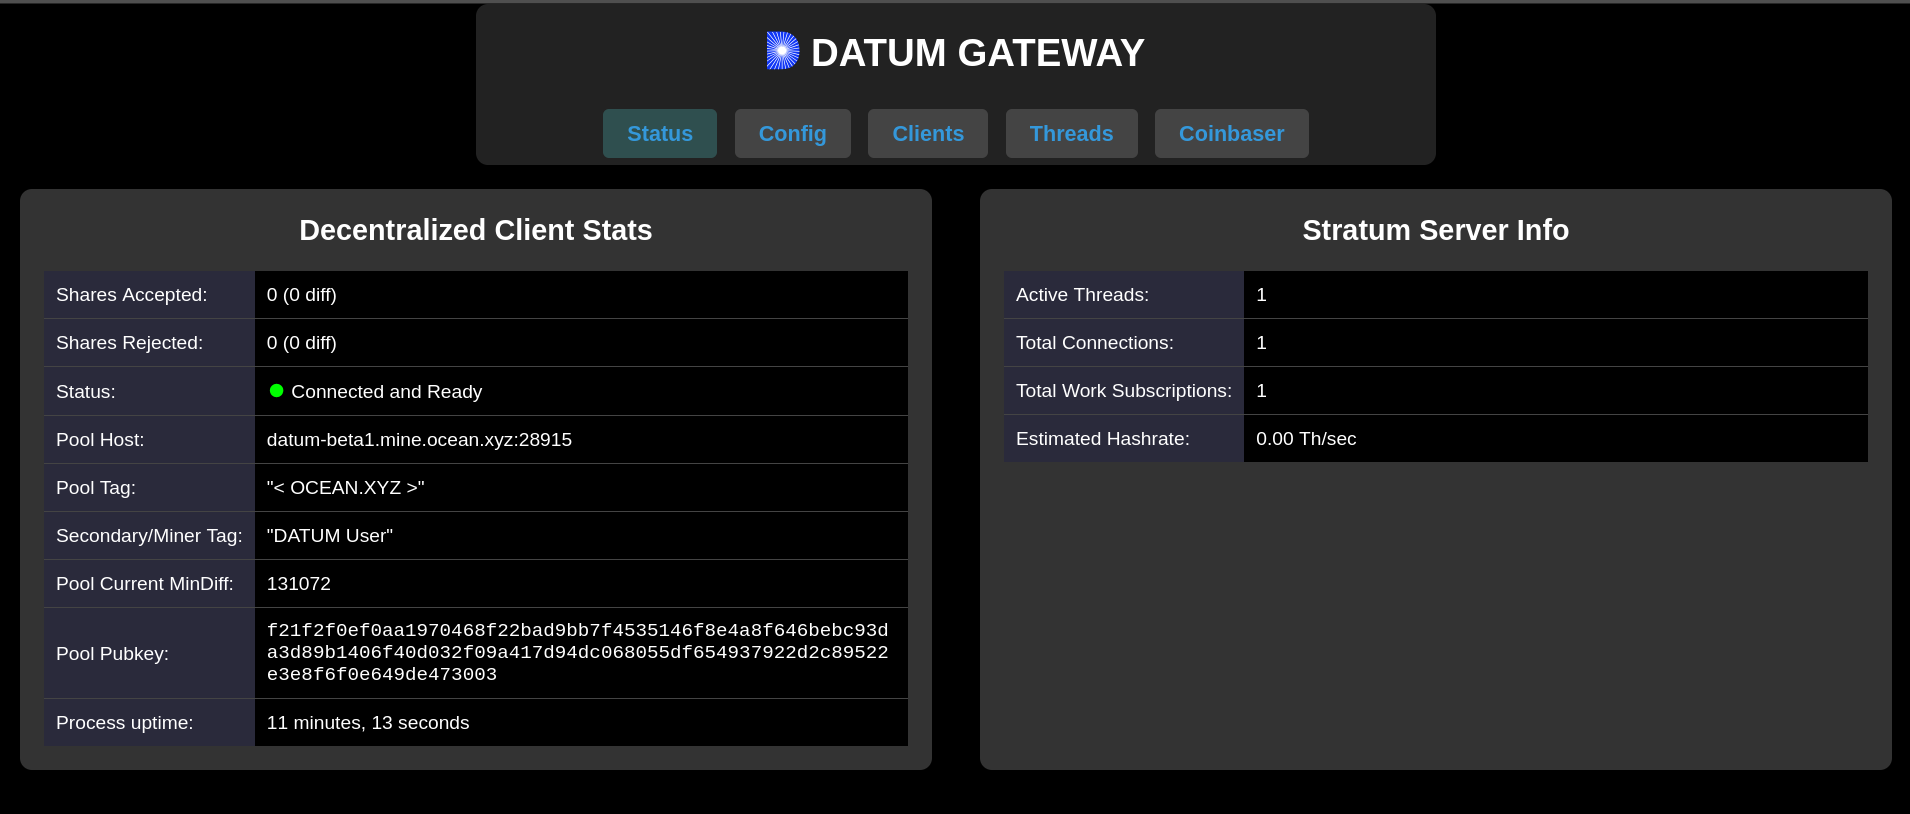
Verify operation by accessing the dashboard: Open `http://localhost:7152` in a browser. Ensure that it connects to the node and pool.
Connecting Your Home Miner (Bitaxe/Nerdaxe)
Continuing in Terminal, enter the following command to identify to local IP address of the machine:
hostname -INote down the IP address shown.
Access Miner Configuration:
For Bitaxe/Nerdaxe, use their web interface (typically at the miner’s IP, e.g., http://192.168.1.x).
In the miner’s settings:
- Pool URL:
stratum+tcp://your_gateway_ip:23334(e.g.,stratum+tcp://192.168.1.100:23334for local network). - Username: As with any Bitaxe/Nerdaxe device, your username is your Bitcoin address.
- Password: Any value (Stratum v1 often ignores it, but set to
xor per pool).
Set a backup pool in the miner’s config (e.g., the pool’s direct Stratum endpoint) in case the gateway disconnects.
Save and restart the miner. Monitor hashrate on the miner’s dashboard and gateway logs.
Shares should appear in the gateway and later
Receiving Payouts using the Lightning Network
Please refer to the previous guide for detailed instructions on how to receive payouts using the Lightning Network.